Follow the steps below to link your Brightcove account to your 3Play Media account to set up the closed captioning integration.
IMPORTANT NOTE: Please note that a transcoding/ingest profile must be set up within Brightcove in order to convert media files to mp4. For more information, visit the Brightcove Support page linked here..
Step 1 - Login to the Brightcove
Step 2 - Navigate to "API Authentication"
- Click on the settings icon in the lower left-hand corner of the page.
- Click on API Authentication.
Note: Only Brightcove account administrators can access the API Authentication section.
Step 3 - Click Add New Application
From the API Authentication page click Add New Application.
Step 4 - Register to retrieve API credentials
Enter a Name and a Short Description of your choice in the available fields. Then, choose an account for authorization from under Available Accounts to add to the Selected Accounts column.
- Please Note: Only ONE account can be selected per API Manifest.
Scroll down on the page to reveal the Exposed Brightcove API's section.
- In the section Exposed Brightcove APIs check the following boxes: Playlist Read, Playlist Read/Write, Video Read, and Video Read/Write under the CMS column.
- Under Dynamic Ingest check the boxes next to Create and Push Files.
Click Save once you have entered the required information and selected the required Brightcove CMS APIs.
See more information on managing your Brightcove API credentials
Step 5 - Copy Client ID and Client Secret
Once Save is clicked the Client Secret and Client ID will be displayed.
Copy your Client Secret and Client ID.
IMPORTANT: Save the Client Secret and Client ID for future reference as these credentials only will display once!
Step 6 - Note Brightcove Account Number
In Brightcove, click your account name in the upper right-hand corner of the page and note the number displayed under "Account" :
If you are currently logged into Brightcove, click here to navigate to Account Information
Please note that only users with Admin access will be available to navigate to this part of the Brightcove account system.
Step 7 - Log in to 3Play Media
Open a new browser window and log into your 3Play Media account.

Step 8 - Navigate to Linked Accounts
After logging in to 3Play Media, click Linked Accounts located at the top of the page.

Step 9 - Select Brightcove
Click the Brightcove icon from the list of video platforms and lecture capture systems.
Click the Brightcove icon from the list of video platforms and lecture capture systems.
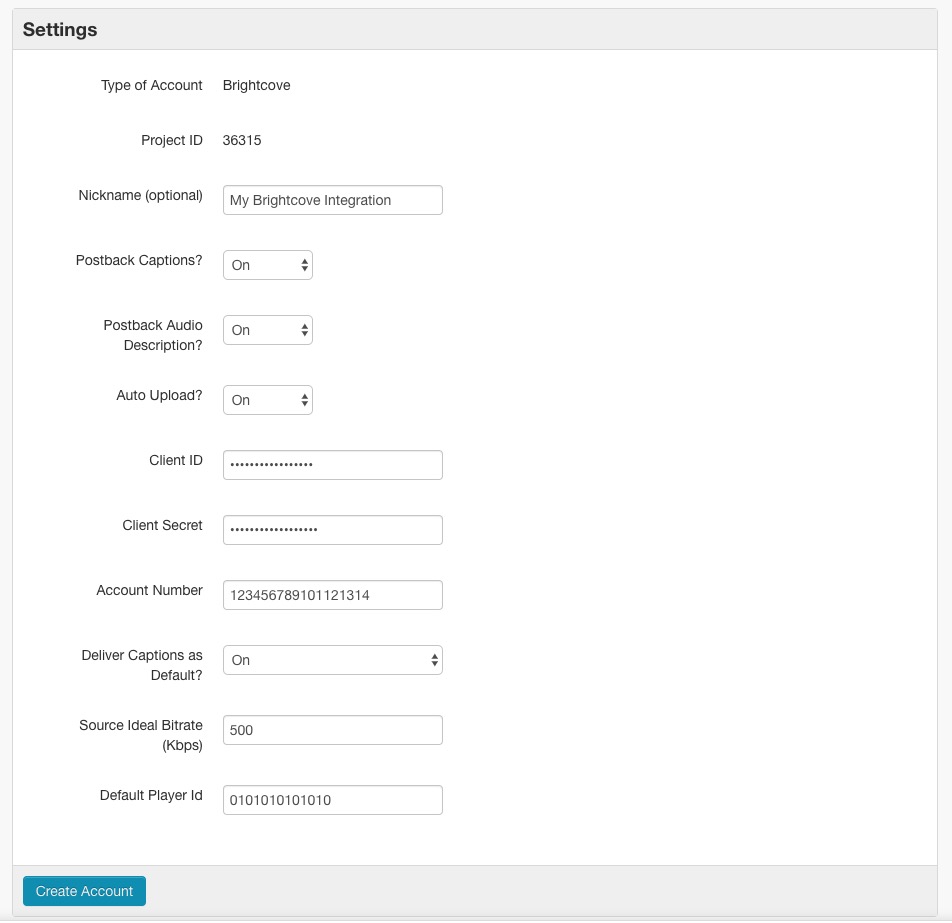
Step 10 - Enter Brightcove CMS credentials
Enter the Client ID, Client Secret, Brightcove Account Number, and Nickname (optional).
Step 11 - Enable Integration Features
Postback Captions
- Turn Postback Captions to On to have captions, upon completion of the transcription process, automatically sent to and associated with the Brightcove assets. While translation requests can only be made directly from the user's 3Play Media account, upon completion of the translation process, the subtitles also will automatically postback to Brightcove.
Postback Audio Description
- Turn Postback Audio Description to On to have audio descriptions, upon completion of the description process, sent to and associated with the Brightcove assets
Auto Upload
- Turn Auto Upload to On to enable the ability to submit caption requests directly from Brightcove.
Once you have entered the required information, click Create Account.
Deliver Captions as Default
- Turn on Deliver Captions as Default to set the caption file returned by the automatic postback as the default caption file for the media asset. This setting is useful if you plan on having multiple subtitle translations on the media asset, but may interact with some Brightcove players such that the track selected as 'default' will play automatically upon player load. To disable this, either turn off the Deliver Captions as Default setting or consult the Brightcove documentation here.