Importing closed captions via FTP is a great option for users importing a large volume of closed caption files. Upload any of the supported caption formats to your FTP program, and our system will detect that file as an import, taking necessary action to convert it to the 3Play system.
Imports are processed through a queue. As such, there may be a slight delay before imported files show up on the My Files page of your 3Play Media project. Imported captions should show up instantaneously, but if the caption files do not show up in the account system within 20 minutes, there may have been a problem with the import process, and you should contact the support team or your account manager.
| Note: Closed captions imported via FTP will only create “master” caption files in your 3Play Media account. If your intention is to associate imported files with existing 3Play Media files this process can only be done via the account system and not via FTP! |
- FTP over TLS is available
Prerequisites
- This service is not available to Express accounts.
- You must have an existing FTP client installed on your computer.
-
The Captions Import module must be activated.
- If the module has not been activated, log in to your 3Play Media and navigate to Settings > Add-On Modules > Captions Import and click Activate Module.
- Click here to be redirected to the Captions Import Module if already logged into the account system
Steps to Import Captions via FTP
1. Click Import Captions
Click the Import Captions button located at the top of the page.

2. Click FTP Settings
From the Captions Import page, click the FTP Settings tab.

3. Connection Settings and credentials
From the FTP Settings page note the connection settings and credentials.
4. Begin the FTP upload process
Open your FTP client.
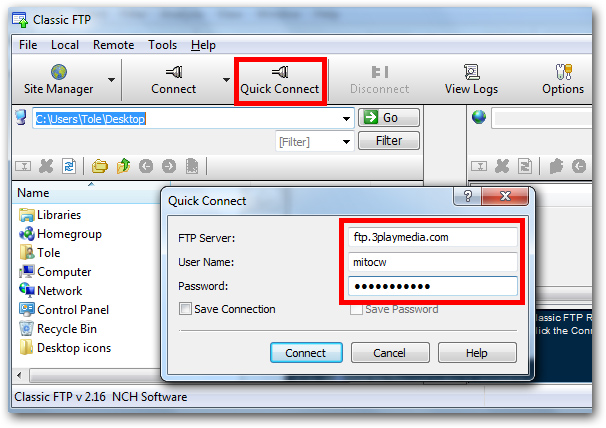
- If you are using the ClassicFTP software, click on the Quick Connect button.
- If you are using Cyberduck click Open Connection.
5. Enter FTP credentials
In the FTP Server field enter ftp.3playmedia.com
Next, enter your FTP Username and Password you obtained in step 3.
Change the Connection Timeout to 120 seconds and click Connect.
6. Create a folder
Create a folder with your chosen name in the FTP client.
- All files uploaded to that folder will be placed into that folder in your account.
- If that folder does not exist in your account it will automatically be created.
7. Add closed captions
Next add the closed caption files to the folder created in step 6.
| Note: Email notifications will be sent to users regarding any closed captions imported via FTP that are unsuccessful. |
Next steps
Please note that Vertical Caption Placement, Caption Encoding and Audio Description services can be ordered for files imported into the 3Play Media account system once a source video has been added to the imported file.